• Skip to main content
  • Skip to primary sidebar

Nucleics

  • PeakTrace
    • About PeakTrace
    • PeakTrace Online
    • PeakTrace Online Pro
    • PeakTrace 6
    • PeakTrace:Box
    • PeakTrace RP
    • PeakTrace for Chromas
    • Buy PeakTrace
    • Why use PeakTrace?
    • Validation of PeakTrace
    • PeakTrace FAQ
    • PeakTrace In Depth
  • DNA Sequencing Products
    • PeakTrace Basecaller
    • PeakTrace:Box
    • PeakTrace RP
    • PeakTrace for Chromas
    • QualTrace
    • LongTrace
    • CounterTrace
    • dLUTE SEQ
    • UniSeq
    • ASIN
  • Support & Services
    • PeakTrace Online Pro Registration
    • QualTrace III Online
    • DNA Sequencing Troubleshooting Guide
    • PeakTrace RP Downloads
    • PeakTrace:Box Downloads
    • Trace Viewers
    • User Manuals
    • Help Guides
      • How to Install Auto PeakTrace 6
      • How to Upgrade to Auto PeakTrace 6
      • How to Update the PeakTrace License on Linux
      • How to Generate a cmDust File
      • Online Activation of Auto PeakTrace 6
      • Auto PeakTrace 6 Online Activation Guide
      • DNA Sequencing Protocols
        • DNA Sequencing Protocol Tips
        • Exonuclease I – Shrimp Alkaline Phosphatase Clean Up of PCR Products
        • Tris EDTA DNA Sequencing Resuspension Buffer
        • DNA Sequencing Reaction Clean-up using Phenol & Butanol
    • DNA Sequencing Service Reviews
    • Software Downloads
    • MSDS
    • Services
      • Genomics Sequencing
      • Bioinformatics
  • Forum
    • Register
    • Login
    • PeakTrace Basecaller Forum
    • PeakTrace:Box Forum
    • Auto PeakTrace RP Forum
    • QualTrace Forum
    • DNA Sequencing Forum
    • DNA Sequencing Software
    • PCR Forum
    • DNA Isolation Forum
    • LongTrace Forum
    • dLUTE SEQ Forum
  • About
    • Contact
    • News
    • Jobs
    • Nucleics Privacy Policy
Buy PeakTrace

Samuel

In Depth: Archive Traces

April 26, 2019 By Samuel

Windows Explorer showing the Input folder with an archive sub-folder and a current trace file

A problem that may be encountered when using Auto PeakTrace™, is reprocessing traces that have not been moved from the input folder since PeakTrace was restarted.

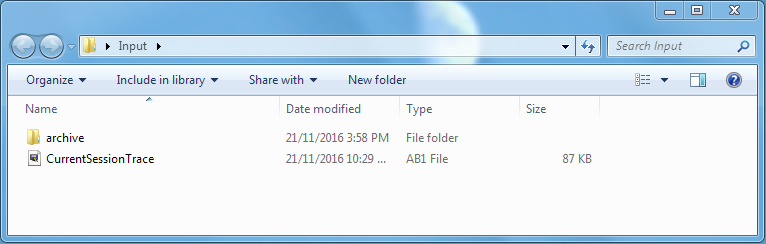
This can be avoided by using the archive traces options. When selected, archive traces automatically moves all input trace files into a sub-folder of the Input folder called “archive” after they have been processed (Figure 1). This option is off by default, but can be selected using the Auto PeakTrace options menu.
Windows Explorer showing the Input folder with an archive sub-folder and a current trace file
Figure 1. An example input folder. Note the archive folder, which will store all previously run traces and prevent them from being reprocessed during a new run.


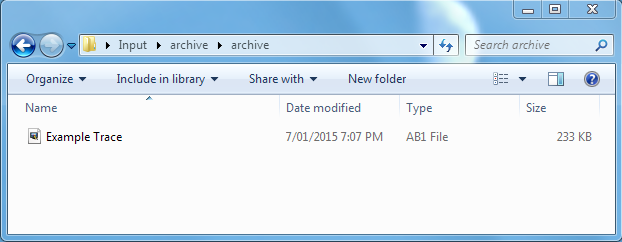
Auto PeakTrace does not look for new files located any deeper than one directory within the Input folder. This means that any .ab1 files that are not within the Input folder, or within a sub-folder of the Input folder, will not be processed by Auto PeakTrace during a run. This means that archived traces, which are stored two directories beneath the Input folder, are not processed again (Figure 2).
Windows Explorer inside the archive folder, two levels below the Input folder, holding an example trace
Figure 2. Inside the archive folder. Note that the traces are stored two directories beneath the Input folder.

Pitfalls with Archive Traces

  • All traces will be moved to the archive folder located within the folder of origin, not a single archive folder.  This means that trace files located within sub-folders of the input folder will be moved to an archive folder within that particular sub-folder after processing.
 

Filed Under: In Depth, PeakTrace Tagged With: archive, archive traces, peaktrace

In Depth: Stealth Mode

August 6, 2018 By Samuel

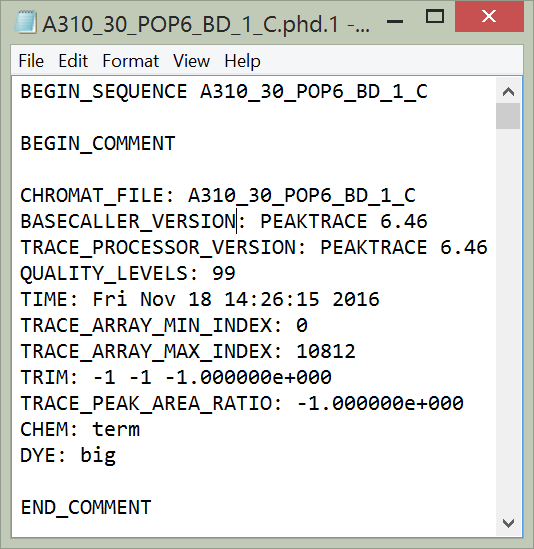
.phd.1 file generated by PeakTrace without stealth mode, recording PeakTrace 6.46 as the basecaller and trace processor

One of the most commonly misunderstood options of the PeakTrace™ Basecaller is stealth mode. The specification of the .phd.1 and .scf file requires that the basecaller and trace processor used are recorded. If PeakTrace is used then PeakTrace should be noted in these files (Figure 1).

.phd.1 file generated by PeakTrace without stealth mode, recording PeakTrace 6.46 as the basecaller and trace processor
Figure 1. .phd.1 file generated by PeakTrace when not using stealth mode.

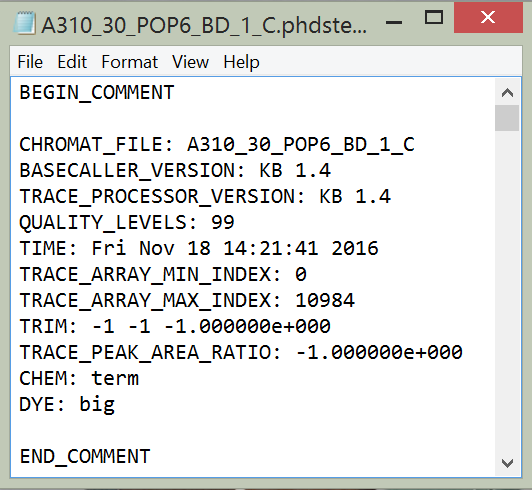
If stealth mode is selected then the trace processor and basecaller recorded within the .phd.1 and .scf files will be KB™ 1.4, hiding that the trace was processed with PeakTrace (Figure 2).

.phd.1 file generated using stealth mode, recording KB 1.4 as the basecaller and trace processor
Figure 2. .phd.1 file generated using stealth mode.

Why use Stealth Mode?

We would prefer that nobody uses stealth mode. Not only is it misleading, it avoids end users knowing that they have got a better trace from their facility using PeakTrace.

The reason why we offer this mode is that one of the major benefits of PeakTrace for commercial users is that it provides a huge competitive advantage over other Sanger DNA sequencing facilities that only use the KB Basecaller – the end user gets more accurate basecalling, longer reads and improved trace chromatograms. Stealth mode allows commercial users to maintain this competitive advantage without letting the competition know how they are able to win so much new business. The bottom line is that this is a feature requested by our customers (the DNA sequencing facilities), not one that we want anyone to use.

Having said this, if your competitors are so keen for you to not find out about PeakTrace then maybe it is a very good idea to investigate what PeakTrace can do. The facilities using PeakTrace are not doing so because they like to waste money, they are doing it because every time one of your customers sees the quality of the sequencing data they switch to their service. The good news is you can use PeakTrace too.

Filed Under: In Depth, PeakTrace Tagged With: commercial, commercial users, in depth, stealth, stealth mode

In Depth: Input Overwrite

July 5, 2018 By Samuel

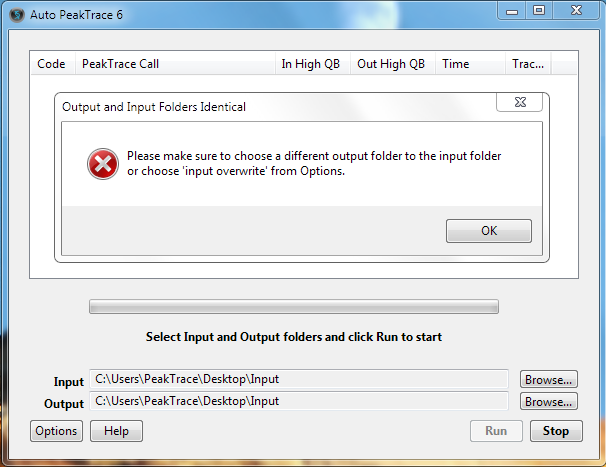
Auto PeakTrace 6 error message saying the output and input folders are identical

A new feature introduced in Auto PeakTrace 6™ is input overwrite.

Under normal circumstances, attempting to set the input and output folder will result in an error when you process the traces. The aim is to prevent the accidental overwriting of the original input .ab1 files with the PeakTrace basecalled version. If you wish to overwrite the input (i.e. have the input and output folders to be identical) you need to select input overwrite. This option is off by default.

Auto PeakTrace 6 error message saying the output and input folders are identical
Figure 1. When input overwrite is off any attempt to process traces when the input and output folder are set to the same directory will produce an error.


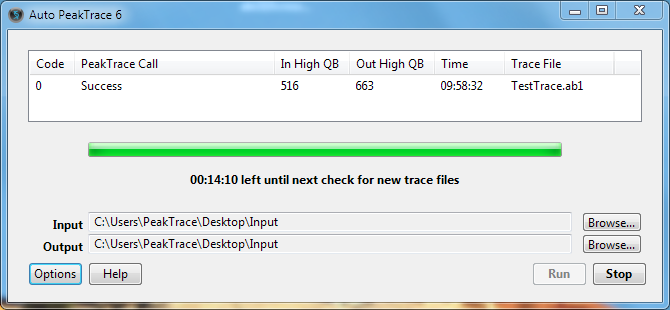
Auto PeakTrace 6 processing TestTrace.ab1 successfully, with the same input and output folder
Figure 2. When input overwrite is on the input trace files can be overwritten by the PeakTrace processed traces.

Potential Pitfalls

  • You need to be very careful when using this feature as the original KB basecalled trace file will be overwritten. If you don’t want to lose your original data then you should leave this option off, or retain a copy of the original .ab1 data elsewhere. While the original trace file can be regenerated by reprocessing through either the KB or ABI Basecallers, if you also use noise raw data there will be no way to regenerate the original trace file.
  • It would be a good idea to archive your traces when using input overwrite to avoid the potential for wasting units on reprocessing data.

Filed Under: In Depth, PeakTrace, PeakTrace RP Tagged With: input, input overwrite, overwrite, overwrite input

In Depth: Force Processing

July 4, 2018 By Samuel

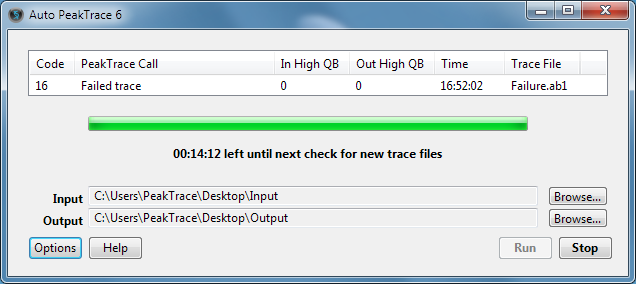
Auto PeakTrace 6 with force processing off, reporting TestTrace1.ab1 as a failed trace and TestTrace2.ab1 as a weak trace

One of the more commonly misunderstood settings within PeakTrace™ is the force processing option. This option will allow you to force PeakTrace basecalling of files that would normally be rejected by PeakTrace for poor quality under normal circumstances (Figures 1 & 2).

Auto PeakTrace 6 reporting code 16, Failed trace, for Failure.ab1
Figure 1. An example low quality trace that PeakTrace fails under default conditions.


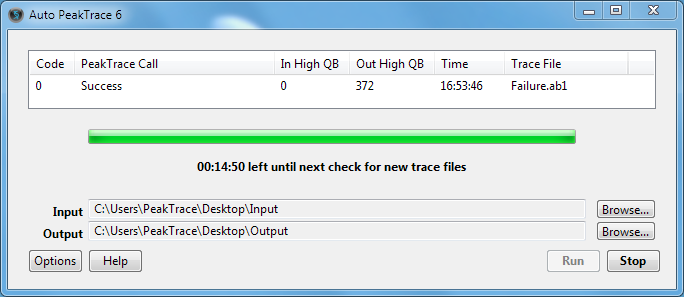
Auto PeakTrace 6 reporting Success for Failure.ab1 with force processing on
Figure 2: Successful PeakTrace basecalling of the same trace after force processing has been toggled on.

Advantages

  • Force processing may be useful when you wish to proceed with processing poor quality traces that are not able to be basecalled by PeakTrace under standard basecalling settings.
  • Forced processing may allow PeakTrace to rescue some usable data from an otherwise unusable trace (Figures 2 & 3).


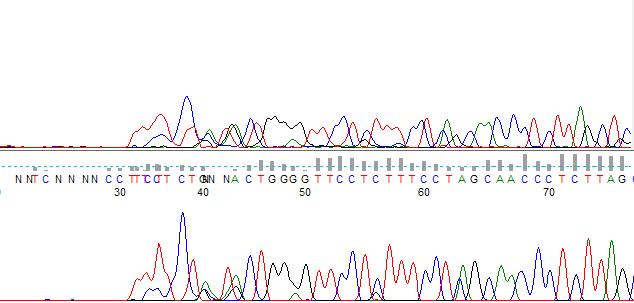
Original failed trace above the force-processed trace, which has basecalls from about base 30
Figure 3. A side by side comparison of the original trace, and the force processed trace. The original trace failed to be basecalled by KB, and was also rejected by PeakTrace under the default settings due to poor quality. Force processing has allowed the PeakTrace basecalling and trace processing to proceed.


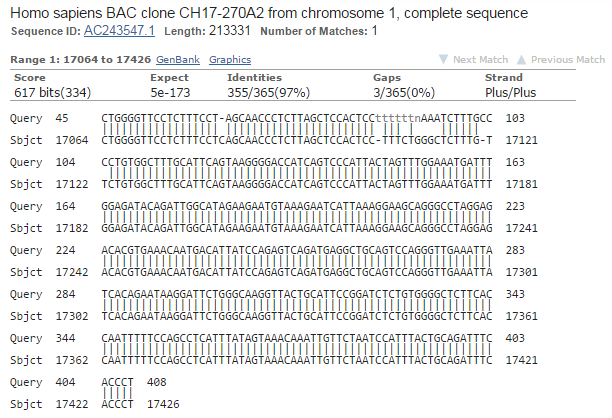
BLAST result showing 97% identity over 365 bases to Homo sapiens BAC clone CH17-270A2 from chromosome 1
Figure 4: Blast alignment of the extracted data reveals a sequence match. Force processing has allowed useful data to be obtained.

Potential Pitfalls

While force processing can be useful to rescue some traces, there are risks with using it on all traces.

  • Force processing may produce nonsensical or corrupted trace files. It is advised that you use this feature only as a last resort, and that you do so with additional caution.
  • Force processing is not magic. It can not create a high quality trace from a failed reaction. In most cases, a poor quality trace indicates that the sample will need to be sequenced again under improved sequencing conditions.
  • Force processing may result in PeakTrace crashing. While PeakTrace can automatically recover from a crash and restart, you may notice the program closing and restarting.

It is advised that force processing is only used if needed and not by default on all traces.

Filed Under: In Depth, PeakTrace, PeakTrace RP Tagged With: force processing, in depth, low quality trace

In Depth: Q Average Trace Trimming

January 12, 2017 By Samuel

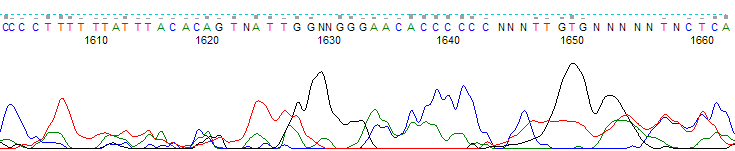
Untrimmed trace end from bases 1605 to 1665, with broad low-quality peaks and many N basecalls

The q average trim option allows you to select a quality score average clipping threshold and window size, so that traces are clipped at their 5′ and 3′ ends when the average quality score in a sliding window of defined base number falls below the clipping threshold. The default values are a quality score average clipping threshold of 12, and a sliding window of 20 bases. This means that by default, all traces are clipped when the average quality score falls below 12 within a window of 20 bases.

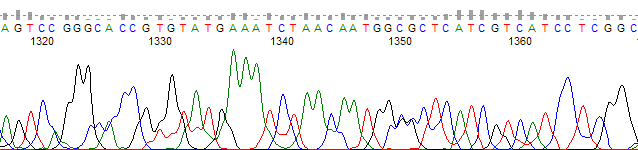
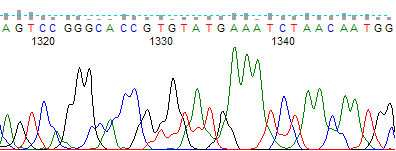
This option is especially useful for removing low quality regions at the 5′ and 3′ ends of your traces. Figure 1 shows an unclipped trace with a poor quality 3′ region and Figure 2 shows the same trace processed using the q average trim to remove the low quality region.

Untrimmed trace from bases 1315 to 1365 with broad, overlapping low-quality peaks
Figure 1. An unclipped trace showing a poor quality 3′ region.
The same trace after Q average trimming, ending at about base 1345
Figure 2. The same trace as in Figure 1, but trimmed with the Q average trim function. Selected parameter values were an average clipping threshold of 15, a sliding window of 20 and the trim 3′ end only function toggled on.

The q average trimming option is compatible with the set ABI limits option, which will perform a soft or “virtual” trim of low quality end regions.

If you have untrimmed traces that have already been processed through PeakTrace and you would like to trim them without being charged more units, you can perform post-process trimming by selecting abi/kb as the basecaller and choosing the appropriate trimming method. Remember to turn off the clean baseline, extra baseline and extra normalization options or else you will be charged for trimming the traces.

Filed Under: In Depth, PeakTrace, PeakTrace RP Tagged With: in depth, q average trim, trimming

In Depth: Unicode Logfile

January 12, 2017 By Samuel

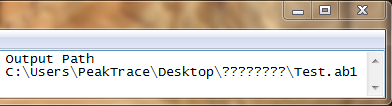
Log file output path with the Unicode folder name shown as question marks, with unicode logfile off

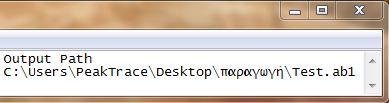
Auto PeakTrace™ 6 (Windows version only) offers support for processing files located inside folders containing unicode characters (non-English), plus the ability to output unicode logfiles. This allows the logfile to be output in Unicode, rather than ASCII text. Under normal circumstances, any Unicode characters will be rendered as a “?” in the logfile (Figure 1), but with this option selected, the logfile will display the Unicode path characters (Figure 2).

Log file output path with the Unicode folder name shown as question marks, with unicode logfile off
Figure 1: The log file of a run where the selected input and output folder were in unicode, but unicode logfile was toggled off.
Log file output path with the Unicode folder name displayed correctly, with unicode logfile on
Figure 2: The same file as in Figure 1, but output with unicode logfile toggled on.

 Considerations

  • Ensure that the program used to open the log file is capable of displaying text in Unicode. Most Windows applications can display Unicode characters.
  • If you are processing files and selecting input and output folders with English-only characters it is advised that you don’t use this feature. Unicode characters can cause some downstream applications that parse the logfile to break. The default is off by default.

Filed Under: In Depth, PeakTrace, PeakTrace RP Tagged With: logfile, unicode, unicode logfile

In Depth: True Profile

December 1, 2016 By Samuel

Whole processed trace with true profile, with peak heights falling towards the 3′ end

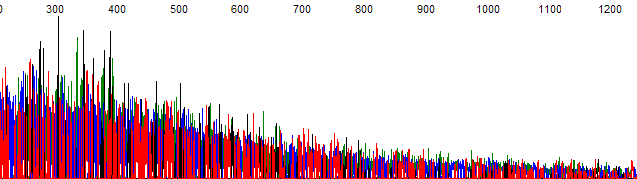
One of the more commonly misunderstood settings within PeakTrace™ is true profile. By default PeakTrace uses a flat profile which normalizes the processed peaks to approximately the same height irrespective of the true signal intensity in the raw data channels (Figure 1).


Processed trace with the peaks normalized to similar heights along its length
Figure 1. Example trace following basecalling and processing with PeakTrace under default settings.

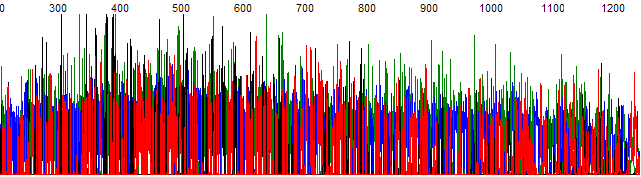
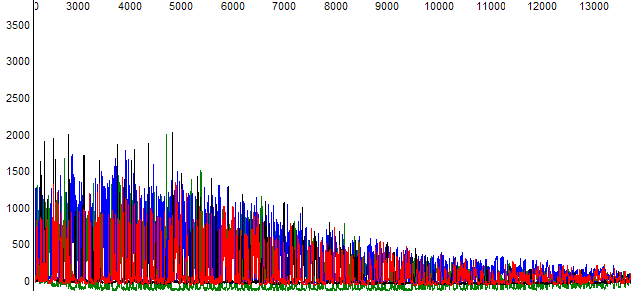
The true profile setting of PeakTrace works in exactly the same way as the True Profile setting within ABI’s Sequence Analysis software. Selecting true profile outputs traces where the processed peak heights reflect the underlying peak intensity in the raw trace data channels. When traces are processed using true profile, samples that show a large peak signal decline will have large peaks at their 5′ ends which taper off to small peaks or baseline noise at the 3′ end (Figure 2). The use of true profile will ensure that the processed peak signal reflect the signal strength profile seen in the raw trace data (Figure 3).


The same trace with true profile, with peak heights falling towards the 3′ end
Figure 2. The same example trace as shown in Figure 1. with true profile selected


Raw data with the signal falling steadily from left to right
Figure 3. The raw data from the example trace shown in Figures 1 and 2.


The main advantage of using true profile is it allows users to quickly visualize any problems stemming from rapid peak signal decline. This can prove useful in helping identify problems that have occurred in sample preparation which the flat profile may hide. The default for true profile is off.

Potential Pitfalls with using True Profile

The major pitfall with using true profile is the peaks at the 3′ end of the trace can be very small if the trace signal declines very rapidly (i.e. a so called “ski-slope” trace).

It is important to note that true profile will not be set if extra normalization is also chosen. Be sure to uncheck extra normalization if you want to output the true profile.

Filed Under: In Depth, PeakTrace, PeakTrace RP Tagged With: peaktrace, signal decline, True Profile

Primary Sidebar

DNA Sequencing Help

We have added a guide on troubleshooting automated DNA sequencing problems.

DNA Sequencing Service Facilities Reviews

Please see our review of 325 DNA sequencing core facilities and commercial services for more information on selecting the right sequencing service for your needs.

QualTrace III Online

Try the free online version of the QualTrace DNA sequencing QC software and see how real time quality control tracking can improve your read lengths and lower sequencing failure rates.

Contact Details

email. information@nucleics.com
phone. +61 3 9016 9373
  • home
  • peaktrace
  • software & reagents
  • forum
  • tools
  • services
  • support
  • about

Nucleics

Sanger Seqencing Software

©Nucleics 1999 - 2026